Loss of power

POSSIBLE CAUSES AND REMEDIES

  • Internal leakage
    • Strip and inspect piston head & tube.
    • Remove the piston and check the seals (static and dynamic).
  • Hydraulic pump failure
    • Check pump & valves.
  • Valve settings incorrect
    • Check and correct the problem.

Piston rod will not retract

POSSIBLE CAUSES AND REMEDIES

  • Internal leakage
    • Strip and inspect piston head & tube.
    • Remove  ithe piston and check the seals (static and dynamic).
  • Port blockage
    • Check ports and pipes for blockages.
    • Check valve operation.

Rod Kick up at end of stroke

POSSIBLE CAUSES AND REMEDIES

  • Internal bearing wear
    • Strip and inspect piston head & gland bearings.
  • Incorrect alignment of piston to gland
    • Check alignment of piston to gland and correct.

Cylinder is getting hot

POSSIBLE CAUSES AND REMEDIES

  • Internal leakage
    • Test for internal pressure bypass.
    • Strip cylinder and inspect piston head & bore of tube.
    • Remove piston and check internal seal.

.

Barrel internally corroded

POSSIBLE CAUSES AND REMEDIES

  • Water in the oil
    • Change oil
    • Protect from water ingress
    • Check the effectiveness of the wiper and possibly change it with another more suitable to prevent the entry of water from the outside.

Piston rod pitting

POSSIBLE CAUSES AND REMEDIES

  • Corrosion
    • Verify the proper lexecution of the anticorrosive surface treatment (usually “chromium plating”).
    • Protect the rod from the weather.
    • Use a material best suited for use in aggressive environmental conditions such as, for example, Nikron 350 (a low carbon content steel with Nickel and Chromium), normally used in cylinders that operate near the sea, in offshore, in the military, in power generation, etc..

Leaking from around the gland od

POSSIBLE CAUSES AND REMEDIES

  • Failure of the static seal
    • Check the condition of static seal (typically a OR) that may have been damaged during the assembly (inappropriate lead-in chamfer).
    • Check the condition of static seal that may have been defective from the outset
    • If the static seal has extrusion signs check the radial gap and reduce it, or add back-up rings, or replace it with another in harder material.
  • Cracked gland
    • Check the condition of the gland ensuring the presence of defects (porosity, blowholes, cracks, etc …) that may be causing the leakage of oil through them.

Gland blown out

POSSIBLE CAUSES AND REMEDIES

  • Possible intensification of internal pressure
    • Check the operating conditions and if necessary replace the cylinder with a more suitable.
    • Check hydraulic valve operation.
  • Threads worn
    • Check threads.
  • Deformation of cylinder tube
    • Check the ovalization of the barrel that could reduce resistance of the thread.
    • An excessive swelling of the barrel (caused by high pressure, reduced thickness, poor quality materials, …) could reduce the resistance of the thread.

Eye bearing broken

POSSIBLE CAUSES AND REMEDIES

  • Shock loading
    • Check operation parameters.
  • Under specification of bearing
    • Increase bearing specification in order to withstand the expected loads.
  • Overloading of cylinder
    • Increase bearing specification in order to withstand the expected loads.

Split weld on base and ports

POSSIBLE CAUSES AND REMEDIES

  • Shock loading
    • Check operation parameters.
  • Pressure too high
    • An excessive pressure (or even just pressure spikes) can damage the welding area. Verify process parameters and possibly change type of cylinder.
  • Poor original weld
    • Re-weld correctly.

Bent piston rod

bentrod-1_med_hr

POSSIBLE CAUSES AND REMEDIES

  • Operation problem possible overload
    • Check operation parameters.
  • Misalignment of cylinder ends
    • A misalignment of the two cylinder ends causes the arise of an unwanted radial component.
  • Outside impact
    • Check.
  • Under specification of piston rod
    • Increase the diameter of the rod.
    • Use a material more efficient.

Cylinder bore scored

POSSIBLE CAUSES AND REMEDIES

  • Contamination of the oil
    • Flush entire hydraulic system.
    • Check and change all filters.
    • Check lthe guide system, clean from contamination and, if necessary, replace it. If particulate matter infiltrates into the guide it will continue to score the barrel.
  • Contaminazione del sistema di guida del pistone
    • Verificare il sistema di guida, ripulirlo dalle contaminazioni ed eventualmente sostituirlo. Se del particolato si è insinuato sulla guida questa continuerà a segnare lo stelo.
    • Because of the contamination entered the circuits, check the filters and change them.
    • Check the effectiveness of wiper that may have left contamination entering the inside of the cylinder.
  • Piston bearing failure
    • Check the guide system and correct the failure. The radial clearance of the guide can be excessive and, due to the eccentricity, the piston comes in contact with the barrel causing seizure.
    • The guide can be undersized and, as a result of heavy radial loads, is crushed letting the piston comes into contact with the barrel causing seizure.

Rod worn on one side

POSSIBLE CAUSES AND REMEDIES

  • Defect in the guide system
    • Check the guide system and correct the fault. The radial clearance of the guide can be excessive and, due to the eccentricity, the rod comes in contact with the gland causing seizure.
    • The guide can be undersized and, as a result of heavy radial loads, is crushed letting the rod comes into contact with the gland causing seizure.
  • Excessive radial loads
    • Verify lthe working conditions and, if necessary, change cylinder type.
  • Rod too small
    • Increase rod size
    • Use a material more efficient.
    • Incorporate external guides

Rod scored

POSSIBLE CAUSES AND REMEDIES

  • Contamination of the oil
    • Flush entire hydraulic system.
    • Check and change all filters.
    • Check the effectiveness of wiper that may have left contamination entering the inside of the cylinder.
  • Contamination of the gland guide system
    • Check the guide system, clean from contamination and, if necessary, replace it. If particulate matter infiltrates into the guide it will continue to score the rod.
    • Because of the contamination entered the circuits, check the filters and change them.
    • Check the effectiveness of wiper that may have left contamination entering the inside of the cylinder.
  • Gland bearing failure
    • Check the guide system and correct the failure. The radial clearance of the guide can be excessive and, due to the eccentricity, the rod comes in contact with the gland causing seizure.
    • The guide can be undersized and, as a result of heavy radial loads, is crushed letting the rod comes into contact with the gland causing seizure.
  • Rod flexure
    • In case of long and/or thin rod it is possible that, subjected to radial loads, there is a flexure in the elastic field (that only happens at the moment of the load but that disappears when it is removed, without leaving any permanent deformation). When this happens, the rod may touch the gland causing seizure.

Irregular movement (Stick-Slip)

meccanica_elementi_tenuta_300
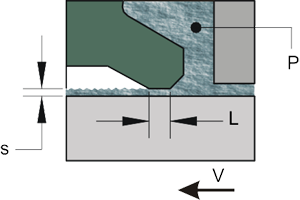
In certain situations, the thin film of fluid (see ‘s’ in the figure), that there should be between the seal and the metal wall, will interrupt bringing items to a direct contact. This lack of lubrication between the seal and the metal wall gives rise to rapid wear and irregular and noisy movement in jargon called “stick-slip”.

POSSIBLE CAUSES AND REMEDIES

  • Low speed (generally <0.05 m/s)
    • If it is not possible to increase the speed, use seals with more flexible lips profiles and/or low friction materials (e.g. PTFE).
  • Too much preloaded seals (compact or semi-compact type)
    • Use seals with more flexible lips profiles.
    • Use seals with low friction materials (e.g. PTFE).
    • Use seals with softer material.
  • Low viscosity of the fluid
    • Change the fluid with a higher viscosity.
  • High temperature
    • The high temperature reduces the viscosity of the fluid (see previous point). If it is not possible to reduce the temperature, use seals with more flexible lips profiles and/or low friction materials (e.g. PTFE).
  • High pressure
    • High pressure increases the force on sealing lip favoring the fluid film interruption. If you can’t reduce it, use a seal less sensitive to pressure changes and/or with a low-friction material (PTFE).
  • Guide tolerances too tight cause stoppage of the rod-piston
    • In This case the impediment is mechanical and must be solved in this regard
  • Poor surface finish
    • Improve the sliding surface
  • Entrapment or air intake
    • Remove the problem

High friction

POSSIBLE CAUSES AND REMEDIES

  • Improper assembly
    • Check the assembly recommendations for that type of seals.
    • Reduce interference fit.
  • Wrong size of seal
    • Check geometric specification.
  • Poor surface finish
    • Improve surface finish.
    • Use a seal material capable of rubbing on a rougher surface.
  • Excessive rubbing speed
    • Different seal type may be required.
  • Excessive pressure
    • Replace seal with a different type, or with different type of elastomer.

Seal damage

POSSIBLE CAUSES AND REMEDIES

  • Extrusion damage
    • The gap behind the seal (the opposite side to the pressure) is too high. Check processing measures and correct them if they are wrong. See radial clearance
    • Check the guide system that could cause a misalignment of the rod/piston increasing excessively the gap from one side.
    • Use a seal with back-up ring.
    • Use a seal in a harder material.
    • Back-up ring mounted on the wrong side. Check the correct position of the back-up ring (“opposite” side to the pressure), replace the seal and reassemble properly.
    • High pressure causes the extrusion. Reduce pressure if possible.
    • High temperature reduces the hardness of the material causing the extrusion. Reduce the temperature if possible.
  • Seal ejected toward the pressure side
    • The seal is mounted upside down. Check for correct mounting direction, replace the seal and reassemble properly.
    • In case of back-to-back mounting, an overpressure is created within the two seals and pushes outwards. Use seals that have the notches on the back which allow the return of the exhaust pressurized fluid without overturning (e.g. type KD profiles or KDA).
  • Worn seal; the sliding surface shows wear with gloss
    • Poor surface finish and excessive roughness (e.g.: drawn tube). Improve the surface finish. See surface finish.
    • Surface treatments (such as Nitriding or Carbonitriding) that create the surface peaks which, although low, have a shape “sharp”. Avoid these types of treatments or resume the surfaces reducing those ridges.
    • Use a material with better resistance to abrasion (e.g. Polyurethane TPU).
    • The seal has worked to dry (see Stick-Slip for causes and remedies).
    • Eccentricity rod-cylinder and/or piston-cylinder. The contact width of the sealing lip differs continually on the circumference, and the areas of maximum and minimum width are roughly symmetrical. Correct the problem of eccentricity, replace the seals and reassemble.
    • Excessive radial load and guides with gap and/or worn. If the guides have too much gap and/or are worn, in the presence of a radial load the rod/piston moves completely to one side causing an abnormal wear on a restricted portion of the circumference of the seal. Reduce the gap, to change/improve the guide system (more suitable for high radial loads), replace the seals and reassemble.
  • Crushed seal; total loss of preload
    • Operating temperature too high. The seal is “remoulded” in the housing losing initial preload and sealing capacity. Reduce the temperature or change type of seal material with a more suitable at high temperatures (e.g. Viton ™, Silicone, PTFE)
    • Cylinder painting temperature too high and/or maintained for too long. The seal is “remoulded” in the housing losing initial preload and sealing capacity. Reduce the temperature of painting or perform a “cold” painting (preferable).
  • Net and deep cuts on the dynamic sealing lip (located in a very specific area or point)
    • Lesd-in chamfer is missing or insufficient. Correct, change the seals and reassemble. See Lead-In Chamfers.
    • Machining burrs on the lead-in chamfers. Remove, change the seals and reassemble.
    • Incorrect ssembly by the operator. See guidelines for assembly
    • Damage by external force (e.g.: seals stored hanging on a nail or wire). Improve storage-system.
  • Hardening of the seal; visible cracks appear when bent with a finger
    • High toperating temperature. Reduce the temperature or use a more suitable material (e.g. Viton ™, Silicone, PTFE).
    • Heat generated by the high speed and/or excessive internal pressure. Use a more suitable material and, in the case of rod, use buffer ring together.
    • Incompatibility with the fluid that has altered the chemical structure of the seal. Change fluid or material of the seal so that they are compatible with one another.
    • Deterioration of the fluid. Old and/or damaged fluids sometimes change their chemical nature becoming incompatible with the seals. Replace the fluid with a new one.
  • Scratch on the sliding surface (in the axial direction, across the width of the gasket from the lip to the back)
    • Metal machining residues are not removed before assembly (burrs on the chamfers, turning, etc..). Removes everything carefully, thoroughly clean, replace the seal and reassemble.
    • Cracking, porosity or signs of corrosion on the metal sliding surface. Remove the problem, replace the seal and reassemble.
    • Foreign material embedded on the seal. Clean, replace the seal and reassemble.
  • Swelling of the seal and the whole seal has softened
    • Incompatibility with the fluid that has altered the chemical structure of the seal. Change fluid or material of the seal so that they are compatible with one another.
    • Contamination from cleaning liquid. Change the cleaning liquid, remove it, replace the seal and reassemble.
  • Small dents on the sliding surface
    • Dust or cuttings embedded in the sliding face due to poor cleaning. Clean, replace the seal and reassemble.
    • Embedded foreign material or embedded oxidized products due to oxidization. Renew oil, replace the seal and reassemble.
    • Because of the contamination entered the circuits, check the filters and change them.
    • Check the effectiveness of wiper that may have left contamination entering the inside of the cylinder.

Perdite regolari dalla guarnizione

POSSIBILI CAUSE E RELATIVI RIMEDI

  • Guarnizioni non adatte alle condizioni d’esercizio
    • Verificare la tipologia della guarnizione più adatta alle condizioni di lavoro richieste. Eventualmente contattare il nostro ufficio tecnico per suggerimenti. Alcuni suggerimenti generali sono:
      • La bassa pressione è generalmente la situazione più critica per garantire una buona tenuta perchè il fluido non energizza a sufficienza la guarnizione. Utilizzare una tipologia di guarnizione più adatta a garantire la tenuta alle basse pressioni (es.: tipo semicompatta).
      • La bassa temperatura tende a irrigidire il materiale riducendo la capacità di tenuta. Utilizzare una tipologia di guarnizione con materiale che mantiene una certa elasticità anche alle basse temperature (es.: Silicone, EPDM).
      • L’alta viscosità del fluido aumenta lo spessore del film di fluido e di conseguenza le perdite. Cambiare il fluido con uno a più bassa viscosità.
      • L’alta velocità aumenta lo spessore del film di fluido e di conseguenza le perdite. In questo caso è dfficile trovare una soluzione che non sia ovviamente quella di ridurre la velocità stessa. Possiamo consigliare di provare a ridurre la viscosità del fluido, di aumentare leggermente la pressione, di aumentare leggermente la temperatura e/o di utilizzare materiali più adatti per le alte velocità (es.: PTFE).
  • Sedi delle guarnizioni corrose o segnate
    • Verificare la presenza di corrosione o rigature sulle sedi e rimuoverle.
  • Aria intrappolata nell’olio
    • Rimuovere l’aria che causa un’usura anomala delle guarnizioni e può innescare micro-esplosioni (Effetto Diesel).
  • Giochi d’accoppiamento non corretti per l’applicazione
    • Verificare la corretta esecuzione di tutte le parti metalliche e il corretto assemblaggio.
  • Contaminazione dell’olio
    • Verificare la presenza di contaminazione nell’olio e rimuoverla oppure cambiare l’olio (preferibile).
  • Guarnizioni montate in modo errato
    • Verificare il corretto montaggio delle guarnizioni. 
    • Verificare il senso corretto di montaggio o utilizzare una guarnizione a doppio effetto quando richiesto.
  • Errate dimensioni delle sedi delle guarnizioni
    • Se le dimensioni radiali della sede non sono corrette, il precarico della guarnizione potrebbe non essere più adatto a garantire un’adeguata tenuta. 
    • Verificare le corrette esecuzioni delle sedi delle guarnizioni ed eventualmente correggerle.
  • Restringimento o dilatazione della guarnizione
    • Per effetto di una interazione chimica fra fluido e guarnizione, quest’ultima potrebbe restringersi o dilatarsi cambiando di fatto le dimensioni originali riducendo la capacità di tenuta.
    • Verificare se il materiale della guarnizione è compatibile con il fluido, altrimenti sostituire il fluido o la tipologia di guarnizione (in un materiale compatibile).
  • Errata guarnizione
    • Verificare che la guarnizione utilizzata sia realmente quella prevista dalle specifiche, altrimenti sostutirla.
  • Precarico insufficiente
    • Verificare le geometrie e le specifiche relative al precarico.
  • Guarnizione danneggiata